

I bought a 47 dollar bunkie board made by Zinus. Bunkie Board is a frame you put under a mattress of your bed to prevent the mattress to sag in the middle for a better, healthier sleep. It’s nothing special, just a boring home product, right? Which is why it caught me with a nice unexpected surprise when I unpacked the product and went through its Out-Of-Box-Experience (OOBE).
Besides the actual product which comes in pieces to be assembled, below are OOBE components that greeted me when I opened a box.

1. An envelope with a thank you message

When you open a dark green envelope, a thank you message comes out. Interesting thing is that it is printed on a slip-off band that wraps around three cards. The message has a nice casual touch. The message explains that because they don’t want to waste materials including their thank you card, they printed their message on a slip-off band rather than on a card itself, so that the actual cards (three of them) can be used as regular cards by a customer to send to friends and family for whatever later occasion.

2. Hardware Kits

All the screws are packaged in pairs so that it’s easy to see and count how many. It’s also nice that the spare parts are clearly labeled as spare. An Allen wrench is included too.

The OOBE package also includes this tool, which is a hex wrench of some sort, in addition to a typical Allen wrench mentioned above. I used the Allen wrench during the assembly, and did not use this tool. But it’s a nice gesture.
3. Instruction manual — overview and components
The instruction manual was the best part. While thank you message and cards are definitely a nice touch, the core user experience of the product OOBE is assembling Bunkie Board itself. Therefore, this is the most important thing.

The instruction manual starts with an overview diagram above. It clearly shows how to place frames in which orientation, and in which particular order to assemble. This is actually quite useful so that you can absolutely make sure to place all the parts in right orientations in right positions relative to each other so that you don’t end up assembling parts the wrong way or the wrong orientation. It seems so simple and straightforward, but there are many hardware products that don’t have as clear instruction as this.
Right underneath the overview diagram, you see Components, which describes all the components needed to assemble the product. Illustrations of components are fairly accurate, both in terms of the shapes and relative size with each other (except the Allen wrench and the screw of course!),which is helpful.
Again, you come across quite a few hardware products with inaccurate technical illustrations on their instruction manuals. When you come across such inaccuracy, sometimes you can immediately tell that it was done purely from production efficiency purposes such as slightly different models with different shapes sharing exactly the same instruction manuals with generic illustrations that may not look like the product you purchased.
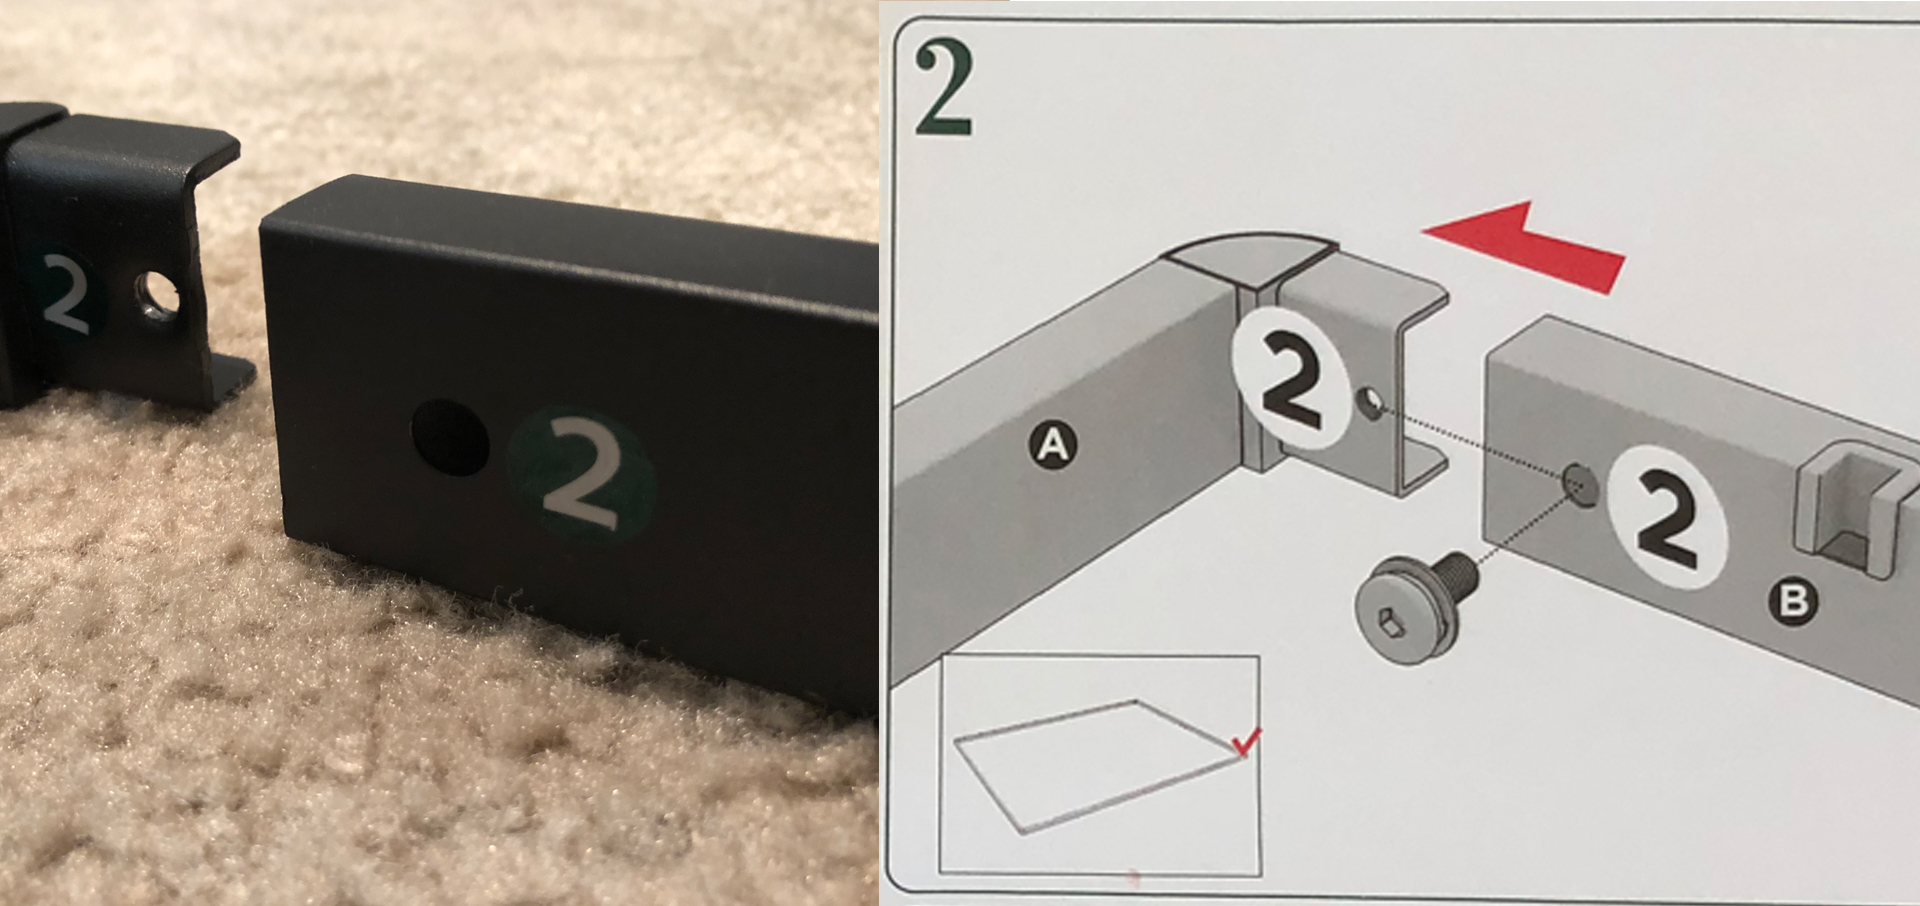
Assembly instruction
When I started assembling with the step 1, it was super-clear because the numbering system on the assembly instruction was consistently carried through to the actual components too. As you can see in the assembly instruction and pictures below, the actual components had numbering stickers, so that you can make sure to match the same numbers to screw those together.


It’s kind of similar to IKEA furnitures in terms of its instruction manual that shows you how to assemble products. But from my perspective, this was done much better, a lot easier and clearer to understand so that you don’t make mistakes. From my past experience, IKEA instruction manuals are sometimes a bit confusing especially when you have similar parts not accurately drawn in illustrations. Also, IKEA instruction manuals have almost no instruction texts, so you have to reply on illustrations only. On the other hand, Zinus Bunkie Board has a better, clearer instruction diagrams, and more accurate illustrations overall with text descriptions if needed.
Another thing that I liked about this product is that it was very well built when considering the price tag ($47). I felt this especially when I inserted all the thirteen “D” parts into slits of “B” parts. (see picture on above-right). Every parts fit perfectly into the slits.
Sure, this is a simple product. How can it go wrong?
But because it’s a simple product, its assembly should be super-clear and super-simple. What I documented here may not seem anything spectacular or magical. Yes, everything is very straightforward. It may seem that it’s a no brainer to make something like this. That’s the beauty, when something is very well thought-out and manufactured, so that everything feels right.
But the fact and reality that there are so many products out there that don’t have its OOBE as simple and clear as this tell me that it is actually quite hard to do what it seems so easy to achieve on paper.
And this type of experience — the one that seems so simple and gives you a pleasant experience without anything too fancy — is what we as UX designers should aim for in whichever products or services we design.
Check out another article on Starbucks free reusable cup, which was also about an unexpected delight from a boring product.