

So previously I wrote an article called “Can a 6 dollar stylus and a trackpad replace expensive stylus?”, and showed how you can actually use a cheap capacitive stylus on a laptop computer’s trackpad to draw.
Today, I wanted to give you a bit more in-depth workflow comparison between these two:
- Draw with a capacitive stylus on a trackpad
- Draw with a pen on paper then scan
OK, let’s start with a stylus on a trackpad. I draw these simple line art illustrations for my YouTube videos.


Let me show you how I do that.

I open a Photoshop file with a dimension of 1920px by 1080px to fit a full HD video. I already have my Photoshop file set up with a blue background. In Photoshop, I choose a pencil, and set a size to be 12px.
Then I choose white color then start drawing with a stylus on a trackpad.

As I mentioned in my previous article, one of slightly annoying things with a capacitive stylus on a trackpad is that you have to do the registration every time you start a new stroke.

This means that you have to move around the stylus to make sure where the cursor is before start drawing. Once you start drawing, it works fine as long as you draw a continuous line.
But once you finish a line, then you need to register the stylus position again.Now this time, unlike the very first time, it’s easier because you just finished your first stroke, so the cursor still remains at where you left off for the most part, so that you can pick it up from there.
When you are drawing with a stylus on a trackpad, basically you have to maintain the clicked status of the trackpad.
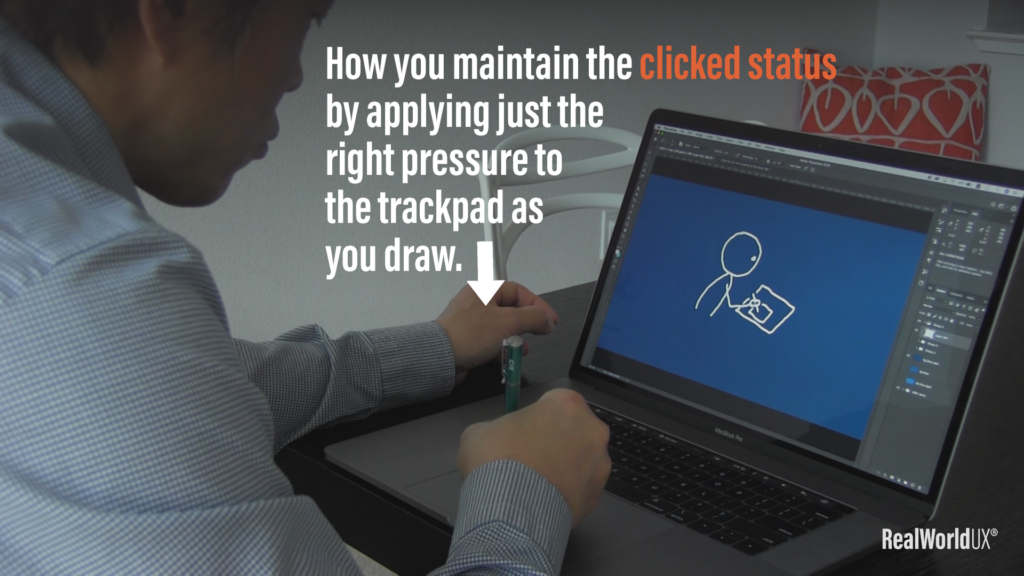
But sometimes, you accidentally exit from this clicked status.
When this happens, you have to apply pressure to get back to the clicked status so that you can draw again.
If you want to change the size of your pen, you just have to adjust the size in Photoshop or whichever software that you use.
Since my illustration style is kind of casual and loose, I worry less about precision. Having some looseness actually adds some nuance and taste to the illustration style, so it’s better not to be super precise.
Once I’m done with basic line drawings, I do the coloring. I use 2-3 colors for coloring. To fill a closed area, it’s a lot easier to use Photoshop’s magic wand tool to make selection. Once coloring is done, that completes the illustration.

Because I drew everything directly on computer with a capacitive stylus on a MacBook trackpad, this is it and I don’t need any back and forth process, which is the beauty of using stylus to draw directly on a computer.
Now, drawing with a capacitive stylus on a trackpad is definitely not as natural as a pen and a paper.
You lose some ability to have detailed, fine-tuned, precise controls.
And it’s a bit annoying that sometimes you accidentally exit from a clicked status of the trackpad.
Also, for the most part I keep my drawing hand off the trackpad while drawing, so that the side of my palm doesn’t get recognized by my trackpad, which sometimes happens.

Overall, you need to be more careful and paying attention continuously on how you hold your hand, how you maintain the clicked status by applying just the right pressure to the trackpad as you draw.
But for the most part, it works fine for this type of rough illustrations.
Now, let me show you how I draw the same illustration using a traditional pen and paper.
Here I have a Sharpie, and I’m drawing on my sketchbook.

The feeling of drawing with Sharpie on a paper definitely feels much better.
You feel like you are actually drawing in a conventional sense.
The strokes are a bit more fluid, and I can draw a bit faster compared to stylus on a trackpad.
I can have a bit more subtle nuance to my illustration.
Once I’m done with my drawing, I scan it using a mobile app called Genius Scan.

It works pretty well.
Again because my illustration style is casual and rough, I don’t need any flatbed scanner for this.
Genius Scan has a few different filters.
For my purpose, I choose black and white so that I can capture my line drawing in a crisp black & white lines.
Once my drawing is captured in black and white using Genius Scan, I airdrop it from my phone to my MacBook.
I open the file in Photoshop, and do the followings:
- increase the contrast
- Select black part, then select “similar” to select all the line drawing parts.
- Fill the selection with white
- Copy & paste selection into the Photoshop file that I already created in 1920px by 1080px with a blue background.
- Scale the illustration down to appropriate size
Finally I have my pen-based line drawing sketch in white on top of a blue background in my Photoshop file.
Coloring part is pretty much the same as I showed you in stylus version.
Now which works better?
A stylus on a trackpad, or a pen on a paper?

It kind of depends on your goals and purposes.
In my case, either one works fine.
Personally speaking, I still prefer a pen on a paper to draw, because you get a better control in your subtle touch, and you feel better when holding and running a pen on a paper.

But it’s also true that the process of getting my pen drawing into a Photoshop file is cumbersome, that I have to go through:
- Scan
- adjust a contrast
- Select and color
- Copy and paste
If I have to do this process over and over again, I get frustrated.
So finally, it depends on various factors:
- Illustration style that you want to achieve
- Number of illustrations that you need to draw
- Subtlety and nuance of your illustration touch
- Complexity of your illustration
- Your own preference
- A Goal and a purpose of making illustrations
Check out YouTube version too.
Also, check out my previous article on a capacitive stylus on a trackpad.